In this blog post, I will describe my first project experimenting with a software defined radio (SDR). For those of you new to this technology, think of it as an RF frontend to your computer, which performs most signal processing from digitized radio waves in software. Hence, virtually any radio communication system can be implemented given capable software. There is already a plethora of projects for a variety of RF applications related to industry or consumer standards. The
CGRAN maintains a list of projects, have a look at it to get an idea of what's all possible.
The test hardware
So, to become acquainted with the SDR, I chose to analyze this simple
RF controlled power switch system I found at my local supermarket. The package contains three radio controlled connectors with a pass through socket for the electrical appliance. The remote control individually switches the connectors on and off by pressing on the corresponding buttons. When switching a controller on and off, the clicking sound of a relay is clearly audible.
Anatomy of the controller
The remote and the connectors are both configured via dip switches inside the enclosure. The address scheme comprises a 5 bit system code (positions 1 to 5 in the pictures below), commonly used by all devices. Also, a unit code (positions A-E) is assigned to each of the connectors to individually address them. Interestingly enough, position E is not provided on the remote, instead, there is a master on/off switch that addresses all units at once.
 |
Dip switches for the selection of the system code (common to all devices)
and the unit code (individual to each connector) |
On the back of the remote control, the model number and most interestingly, the operating frequency 433.92MHz are engraved on the enclosure. Within the enclosure, a PCB with a single IC labeled AZ08C20, P50 0322D. Unfortunately, I couldn't find any specification for this chip that would ease the task of analyzing the control signal. There are specifications publicly available for similar ICs that helped me grasp the encoding principle: for example Princeton Technologies PT2262 and PT2272, and Holtek HT12A and HT12E.
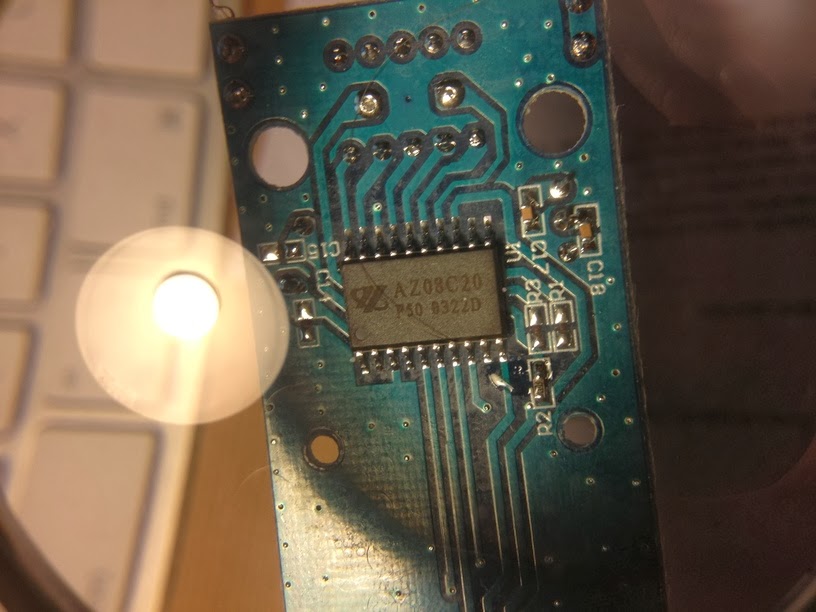 | |
The remote control's IC:
AZ08C20 P50 0322D |
Visualizing the signal
For this, I designed a
GNURadio flowgraph. The source block provides the data from the SDR. Use either a
UHD source for USRP devices from
Ettus Research or else a
OsmoSDR source for
USB DVB-T dongles,
BladeRF or
HackRF. The data provided by the source is a stream of complex I/Q values, represented by pairs of 32bit floats. If you're not familiar with I/Q data, here are two
excellent write-ups to learn about this data format and why it's used for SDRs. After reading this, you'll understand how the
Complex to Mag^2 block is used to convert the complex I/Q samples into a real, scalar magnitude sample. The
Threshold block is used to distinguish between HIGH and LOW states of the signal. Both real and discrete signals are input to the
Scope Sink for the visusalization. The
Wav File Sink is used to create a .wav file which can then be analyzed using common audio processing software such as
Audacity.
 |
| GNURadio flowgraph used to visualize the signal |
In the scope visusalization, we can see that the amplitude of the carrier frequency is modulated to form pulses of varying widths. This modulation scheme is called (binary) amplitude shift keying (ASK) or also sometimes On-Off-Keying (OOK). The encoding is a discretization of pulse width modulation (PWM), where pulses of different widths represent different information symbols. I determined the duration of the short (unit) pulse to be 533µs by measuring the number of samples across its width. The long pulse is twice as long: 2*533µs = 1.066ms. The blank between each pulse is of same duration as the unit. Effectively, each pulse starts after a period of 3*533µs = 1.6ms. Messages are continually sent in bursts of 25 pulse periods with a pause of 3.2ms inbetween, for a total of 128ms per message.
Replaying the signal (security implications)
Having recorded the signal as .wav file or as raw data, the flowgraph can be reversed to replay the messages. Choose the
Wav File Source and connect it to your SDR sink (either
UHD Sink or
OsmoSDR Sink). This already suffices to trigger the switch. This indicates that there is no security whatsoever to protect the connectors from receiving messages not originating from the remote control. Also note that the number of possible different addresses (given by the combination of dip switch positions) is very low, 2^5 = 32, hence an attacker can very rapidly guess it by running through all possibilities.
Reverse-engineering
Assigning a short pulse to 0 and a long pulse to 1, I wrote down the different code patterns while pressing each button and systematically changing the dip switch positions. I could not identify every bit's meaning in these patterns, but I retrieved enough information to synthesize message which would actually trigger the switch. Here are some examples having all dip switches for the system code on HIGH:
DIPSW ????? ?????? B ?? EDCBA ?
A OFF 11111 00011 100101 0 00 00001 0
B ON 11111 00011 100111 1 00 00010 0
B OFF 11111 00011 101000 0 00 00010 0
C ON 11111 00011 101001 1 00 00100 0
C OFF 11111 00011 101010 0 00 00100 0
D ON 11111 00011 101100 1 00 01000 0
D OFF 11111 00011 101100 0 00 01000 0
Master ON 11111 00011 101101 1 00 00000 0
Master OFF 11111 00011 101110 0 00 00000 0
So obviously, the dip switches are reflected by the 5 first bits in the message. The 17th bit always correlates with the on (1) and off (0) button. Finally, bits 20-24 reflect the unit code. Concerning the remaining bits, I suspect bits 11-16 to be a counter and the rest to be padding.
Synthesizing the signal
After gathering all this information about the signal and the encoding, I decided to write a small GNURadio application with python to replicate the remote control in software by emitting the signal from the SDR. You can access the code
here on github. The basic idea behind the modulator is to process the incoming stream of bits and converting them into I/Q samples. In order to describe the pulse train, I defined a intermediate 2-bit mapping according to following diagram, which will help you understand the code:
 |
| Intermediate 2-bit encoding of the pulse-widths |
Using this mapping, a logical 0 is encoded with 01, a logical 1 is encoded with 10 and the pause between each burst is encoded with 00. Note that code 11 is never used. The GUI is designed to resemble the remote control's interface:
 |
Application replicating
the remote control. Uses the
GNURadio framework |
That's it, I hope you enjoyed reading this. If you did, don't miss the flattr button ;-)


